In Australia’s competitive tradie market, it’s not enough to say you’re good, you’ve got to show it. Whether you’re a plumber fixing burst pipes, a builder completing stunning renovations, or a landscaper transforming outdoor spaces, high-quality project photos speak louder than words. They’re not just for social proof. They boost your SEO, help you rank better on Google, and convert more visitors into leads.
This guide breaks down exactly why visual content matters, how to set it up properly, and how to make your blog work harder with the help of real-world imagery.
1. Why Photos Matter
1.1 Photos Build Credibility & Trust
People don’t want to guess what your work looks like, they want to see it. Clear, real, project-based images give them confidence. A before shot of a worn-out kitchen and an after photo showing a sleek, modern design tells a powerful story.
For tradespeople, the benefit is twofold:
- It shows your skills.
- It sets expectations.
You’re not just telling people you’re reliable; you’re proving it. According to BlueTone Media, “Optimized images and videos boost rankings and improve user experience”, which means your blog isn’t just more trustworthy, it’s more findable too.
1.2 Visual Content Enhances SEO
Google doesn’t just rank words. It ranks images. Photos with proper file names, alt text, and captions can show up in Google Image Search. That’s another way to pull in traffic, especially from people who are visually browsing for inspiration or examples before hiring.
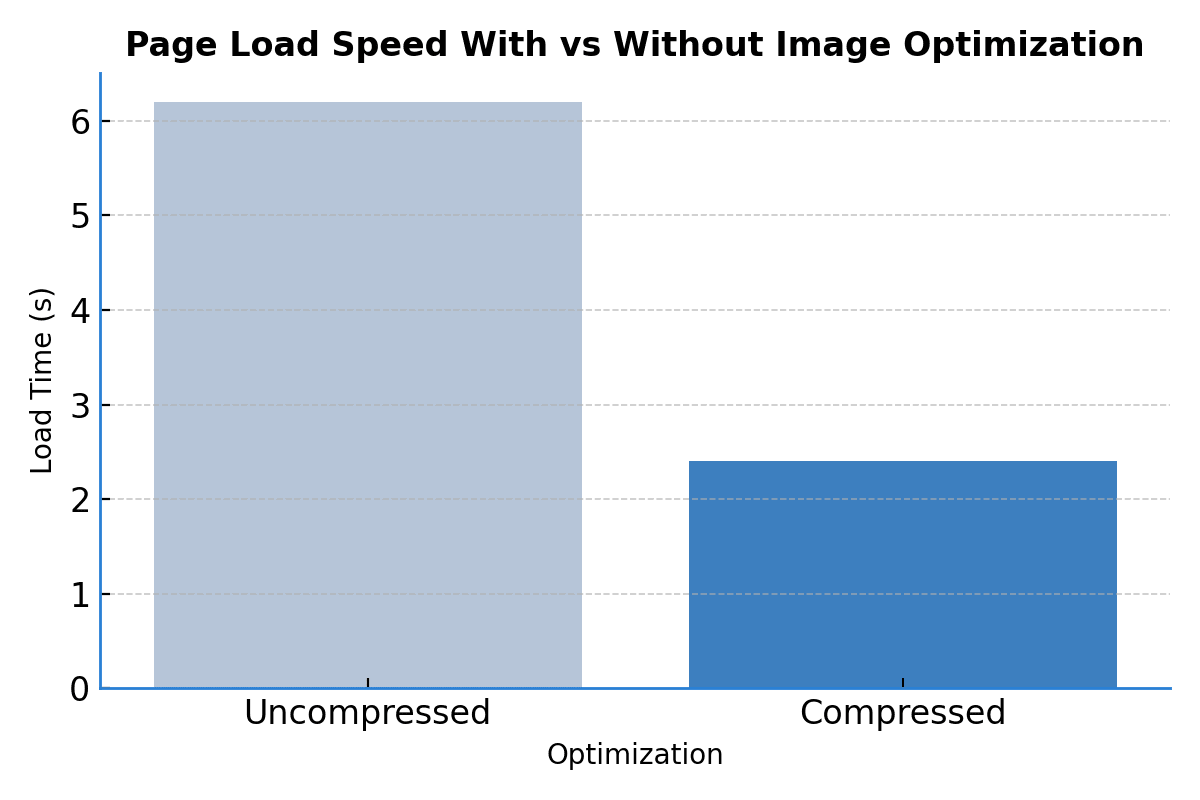
Using image optimization tools (like Scaleflex or ShortPixel) helps reduce image sizes without wrecking quality. That means faster load times, which equals better SEO. Google cares about how fast your pages load, especially on mobile. Speed boosts rankings, lowers bounce rates, and increases time-on-site.
1.3 Photos Improve Engagement Metrics
Blog posts with images get nearly double the engagement compared to text-only posts. When people linger longer, read more, and click around, your blog signals value to Google, and that improves your ranking. More clicks, longer dwell time, and higher conversions all stem from having solid visual content.
Graph: Engagement Comparison Graph
Shows how blog posts with images nearly double the engagement compared to text-only posts.

2. Gallery Setup
2.1 Curating Your Project Galleries
A gallery shouldn’t just be a photo dump. It should be curated. Think of it as a digital showroom. Use clear categories (like “Bathroom Renovations” or “Deck Builds”) to organize the work.
Include:
- Only your best work, no blurry or half-finished jobs
- Descriptive titles and short captions (“Outdoor pergola, Glen Waverley, completed in 3 days”)
- Group projects by type or location
- Tag services and materials used (e.g., “Colorbond roofing” or “Merbau decking”)
If you’re using WordPress, consider gallery plugins like FooGallery or Envira Gallery that offer built-in optimization and mobile responsiveness.
2.2 Technical Gallery Best Practices
User experience matters. A clunky, confusing gallery is worse than none.
Use features like:
- Rollover zoom (so users can inspect details)
- Prev/Next thumbnail navigation (encourages them to keep browsing)
- Image count indicators (“Image 2 of 6”)
- Full-screen view (especially useful on desktop)
- Keyboard accessibility and swipe gestures for mobile
Design tip: On mobile, give a subtle edge shadow or arrow to thumbnails to show there’s more to scroll. It nudges users to keep exploring.
2.3 Photo Optimization for Performance
This is where a lot of trade blogs fall short. They upload massive, raw images straight from a phone or camera, slowing the whole site down. Don’t do that.
| Task | Why It Matters |
| Use JPG/WebP formats | Smaller size, good quality, faster load times |
| Compress images | Tools like TinyPNG or ImageOptim keep things light |
| Descriptive filenames | “bathroom-renovation-brisbane.jpg” > “IMG_0932.jpg” |
| Add alt text | Helps Google understand the image, aids accessibility |
| Use structured captions | Adds relevance for SEO, keeps users engaged |
And if you’re serious about SEO, serve images via a CDN (Content Delivery Network). It’ll improve loading speed for users in different parts of Australia.
Graph: Image Optimization Speed Graph
Illustrates how compressed images significantly reduce page load times.
3. Before/After Showcases
This is where your work can really shine. A well-executed before-and-after tells a full story of transformation, and it is extremely compelling content.
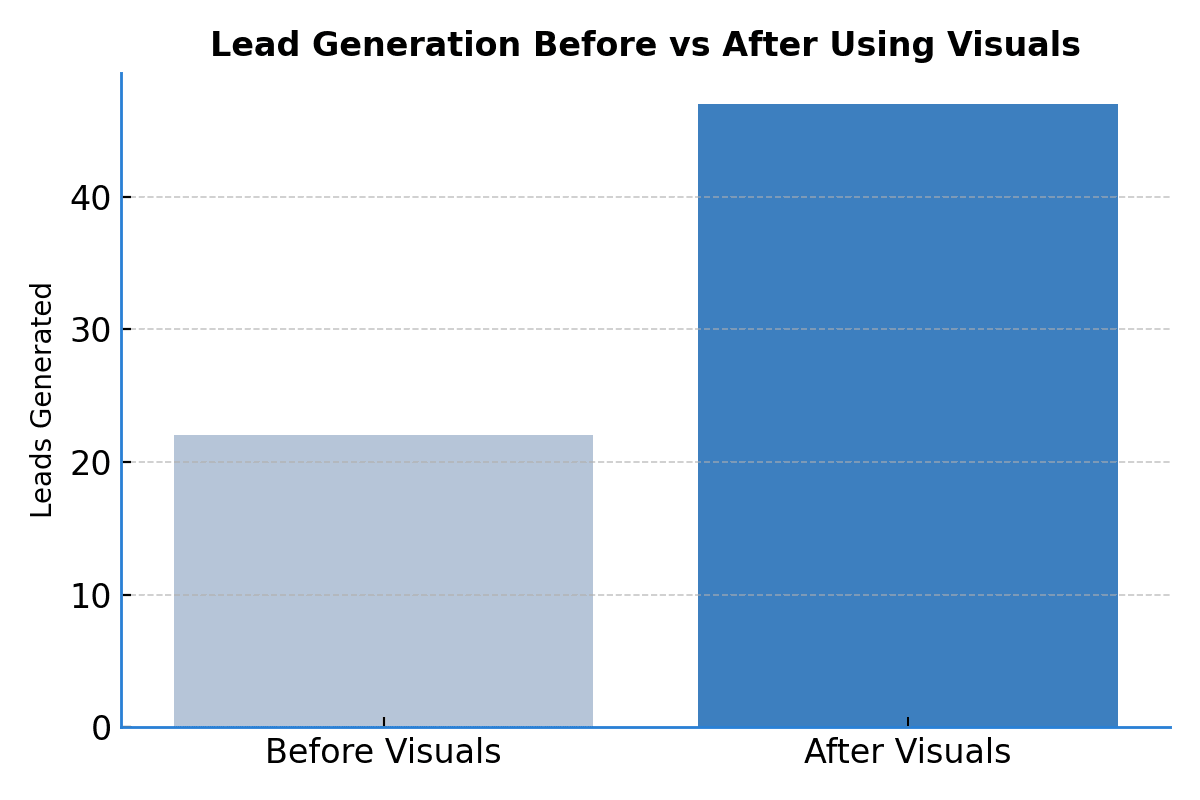
Graph: Lead Generation Before vs After Graph
Highlights the increase in leads after implementing before-and-after visuals on project posts.
3.1 Structural Setup
To do it right, don’t just throw two pictures next to each other. Give context.
Structure it like this:
- Introduction: What was the issue? Where? What was the client’s goal?
- Images: Use an overlay slider (many gallery tools offer this) or a side-by-side layout.
- Project Details: What did you do? How long did it take? What materials were used?
- Outcome: What changed? Any customer feedback?
- Call-to-action: Invite readers to “See full gallery” or “Get a free quote”.
Example:
Client in Geelong wanted a full bathroom redo. Old fittings, water damage, and outdated tiles. Took 5 days, full waterproofing, new tiling, matte black tapware. Client saved ~$900 by choosing a package option.
3.2 Expand Into Case Studies
Case studies go deeper. They combine before/after visuals with a full narrative.
What to include:
- Client’s problem and your solution
- Steps taken: planning, materials, timeline
- Budget range (transparency builds trust)
- Quotes from the client (“We couldn’t be happier, on time, on budget!”)
- Location and date for local SEO
- Use structured data/schema for CaseStudy and ImageObject
Common Questions
- Do I need professional photos or can I use smartphone images?
Smartphones today take high-quality images suitable for blog posts. Just ensure good lighting, clean backgrounds, and no blur. - Should I watermark my tradie photos?
Yes. A subtle watermark protects your work from misuse, especially if shared on social media. - How do I optimize images for SEO?
Use descriptive file names, compress image sizes, include alt text, and implement lazy loading for better speed and rankings. - Is there a limit to how many images I should include in a post?
No strict limit, but focus on quality over quantity. Group images into galleries if you’re adding more than 10. - Can using images really improve my Google rankings?
Yes. Optimized images boost engagement, which improves metrics like dwell time—important for SEO. - Are there legal issues with showing client homes in photos?
Yes. Always get written permission before using identifiable client properties or faces online.
Conclusion
If you’re a tradie running a blog, stop treating visuals as decoration, they’re your proof of performance. From crisp site photos and structured galleries to strategic before/after showcases and detailed case studies, every image should work for your business.
Done right, visual content:
- Builds trust with potential clients
- Drives SEO through optimized, structured images
- Boosts conversions by showing, not just telling
Then here’s your next move:
Audit your current photos. Remove anything low-quality. Optimize what’s good. Then set up a proper gallery and start creating case-study content with SEO in mind.
Your blog doesn’t need to be flashy, but it should be visual, functional, and real. Do that, and your next visitor might just become your next job.
We design high-performing websites and deliver SEO that gets results. Trusted by businesses across the UK, US, AU, and CA.
www.theseocrunch.com | theseocrunch@gmail.com